9.25.2012

Seuss Stuff

I realize my youngest son is now 4 months old... and his nursery is still not finished... what can I say, I am a procrastinator through and through.

But time is not my friend seeing as I have so little of it with a toddler and a 4 month old. So I have to make progress when I can... it's been kind of a sloooow go.

However, the past week I did accomplish something in 'Seussland,' and I am in love with it! 

I knew from the beginning that I wanted a floating shelf in baby Drew's room, and I fell in love with one that I spotted at Pottery Barn.
  Oh yes, she is beautiful! But I did not like her $85 price tag =/ just a little too steep for a shelf in my son's nursery. 

So I went on the hunt for something within my budget. Goodwill to the rescue!
Obviously she had seen better days, but I believed I could restore her to her former glory. And for $6, I was thrilled with my 4-foot find. 

After some primer and a coat of paint she now proudly graces my son's nursery.


I purchased the shelf and all of its decor for much cheaper than what the Pottery Barn shelf alone cost.
I got the black frame, the two letters (which stand for Andrew,) and the little, red box all from Hobby Lobby...all on sale. The white frame came from Wal-Mart. It was just a plain, wooden $3 frame that I painted white and scuffed up a bit. 

The Seuss pictures are actually fabric left over from Drew's Seuss quilt that I starched, ironed and framed.


I love the way it turned out... and I can honestly say I take way more pride in my frugal finds than I would have if I'd forked over 85 bucks for the Pottery Barn beauty. 

Happy Thrifting!


It's Fall Ya'll!


Saturday officially marked the beginning of FALL! >insert super duper thrilled squeals here<

In honor of the very best season of all, Saturday I did some Fall themed shopping. 

I found lots of goodies :)

Here are some favorites:

Bath & Body Works Candles
I had to smell each seasonal candle in the store... at least a few times... and as much as I wanted to love them all... I didn't. But the Cinnamon Sugared Donut and Pumpkin Cupcake put a smile on my face! So warm, so delicious, so FALL. 

Don't ya just love the yummy aroma of a great candle?

Bath & Body Works Anti-Bacterials
 I never leave the house without anti-bacterial, but I despise the smell of it. Fun Fall scents to the rescue!
These five smell amazing... and out of these five the Creamy Pumpkin and Sweet Cinnamon Pumpkin were my favorites. So here's to clean, good-smelling hands!

Fall Dining Room Table Centerpiece
Courtesy of Hobby Lobby... this centerpiece now graces my dining room table with all of its Fall fabulousness :)

I am welcoming Fall with open arms!


9.19.2012

The Harvest Moon Shoppes


The Harvest Moon is an adorable shop that specializes in upcycled, shabby chic lighting and wine bottle torches. 

On top of offering upcycled glass bottle tiki torches and vases, they also sell the hardware to create your own!

Be sure to also check out their gorgeous, real pressed flower jewelry! 

The Harvest Moon is the perfect place to shop for unique home decor and jewelry. Not to mention, perfect for shabby chic wedding decor!

Go check out this sweet shop and see all of the wonderful things it has to offer!


9.18.2012

Pizza Quesadilla


We are a quesadilla lovin' family. They are easy, delicious and cheap! We often do our own variations of the Mexican Quesadilla, but we had never tried the Pizza Ques. Oh me, oh my it was fantastic! Deliciously crisp, oozing with cheese and warm pizza sauce, bursting with flavor and leaving our tummies very happy.

You have to try it. Seriously... it's a must!

Ingredients

4 flour tortillas
8 oz of shredded mozzarella cheese
Parmesan Cheese (for sprinkling)
1/3 lb sliced pepperoni ( I suggest getting it from your deli)
1 16 oz jar of pizza sauce
1 tsp. dried oregano

Directions

First, I suggest frying the pepperoni in a small sauce pan over medium heat until the edges start to curl up and become crisp. Set the pepperoni aside. Now, spread a small amount of pizza sauce on one side of the tortilla. Be careful not to spread the sauce too thick, it will make the tortilla soggy. Remember, if it doesn't have enough sauce for your liking, you can dip the quesadilla slices in the pizza sauce once it's done cooking. Okay, now on to the toppings. On one half of the tortilla: Sprinkle some mozzarella cheese over the sauce (as much or as little as you like), add 1/4 of the fried pepperoni, then sprinkle some Parmesan cheese and a little bit of dried oregano. (Remember these toppings only go on one half of the tortilla!) Now, fold the half of the tortilla without toppings over. Make sure all of the toppings are completely covered by the tortilla, you don't want all of that yummy-ness falling out! 

Preheat a medium sized skillet over medium heat. Carefully lay the folded quesadilla into the pan. Cook for about 5 minutes per side, or until the tortillas are nice and crispy and the cheeses are completely melted. 

Don't forget to serve with some of that leftover pizza sauce for dipping!

Ta-da! You're family will now revere you as a culinary genius ;)


P.S. I added some sauteed mushrooms to mine.... It was delish!


9.14.2012

Pop Tart iPhone Case: Winner!

 Winner Announced!

and the winner is.....

Shasta Farrar!
 Shasta, I have sent you an email :)


9.13.2012

Smoked Club Wrap


The wrap is a wonderful thing, the possibilities are endless. Whoever invented the wrap... I thank you and all of your brilliance!

Summer is coming to an end... so to bid the season good-bye, here's a deliciously light, summery recipe. 

But just to be clear, around here, wraps are a year-round dish ;) You can dress them up to fit any season.

Ingredients for One Wrap
1 Large Flour Tortillas
2 1/2 oz of Smoked Turkey
1 Slice of Sharp American Cheese
1 Slice of White American Cheese
2 Sliced of cooked bacon
Ranch Dressing
2 slices of Tomato
Baby Spinach (you can find it in the salad section of your local grocery store)

Directions
Just below the center of the tortilla, spread the ranch dressing (as much or as little as you like.) Then, on top of the ranch, layer the turkey, cheeses, bacon, tomato and spinach. Next, fold in both sides of the wrap. Start at one of the unfolded ends and roll the wrap. When plating the wrap, place it seam down. Cut diagonally down the center of the wrap.

You can add any other fillings you like... For instance, I added fresh, sliced mushrooms. 


9.12.2012

Pink Sky Printables


Like a lot of mothers, when it comes to party invites, announcements and party favors, I have always got my 'go-to' websites/stores. It's easier to go somewhere I know than to search and search for somewhere new. But, if you are anything like me, after a while of shopping at the same places, you just want something different; a new variety! Well, if you are looking for a new party vendor with super adorable designs and super affordable prices... Look no further than Pink Sky Printables !

This darling store offers a huge variety, killer prices, and gorgeous designs! Offering everything from 1st Birthday to Save the Date invitations and everything in between. Also, look for Wedding invitations soon!

Pink Sky Printables also offers printable party packages, so you have all of your party needs taken care of in a one-stop shop!

I have fawned over so many of the designs, but here are a few of my favorites to give you a peek at this adorable printable party store!


Go check out Pink Sky Printables for yourself!


9.11.2012

Chicken Bacon Grilled Cheese


One of my favorite, super quick, go-to recipes is the grilled cheese. They are easy, yummy and you can have lots of fun experimenting with them.

My lastest experiment was a scrumptious success! So, I'm sharing it with you ;)

Ingredients
2 packs of Tyson Grilled & Ready Chicken Breast Strips (heated according to packages directions)
Sliced Bread (I used Nature's Pride Country White)
Honey Mustard
Bacon (fully cooked and crumbled)
Sliced White American Cheese
Butter

Directions

Heat your grill (if you are using a pan, heat over Medium.) Lightly spread butter on the sides of the bread that will be touching the grill. On the bottom slice, layer one slice of white American cheese, about half a package of the grilled chicken strips, and crumbled, cooked bacon on the non-buttered side of bread. On the top slice, spread the honey mustard on the non-buttered side (use as much or as little as you want, the more you use the sweeter the sandwich will be.) Place the top slice onto the layered, bottom slice, buttered side up. Now, carefully place the sandwich onto the hot grill and close the grill. Cook the sandwich until the bread is golden brown, it should only take a couple of minutes. If you are using a pan, place the sandwich in the heated pan for a couple of minutes, or until golden brown, flip and cook the other side until golden brown, as well. 

Serves 4


I loved the combination of the chicken and bacon with the sweetness of the honey mustard...all topped off with the gooey white American cheese. This is a family favorite of ours. Hope you enjoy!


9.07.2012

Slow Cooker Pot Roast on a Roll


If you know me well, you know I can not pass up a good Pot Roast. I was so intrigued by this recipe, because I had never tried roast quite like this. 

And for this self-proclaimed Pot Roast connoisseur, I was not disappointed. I loved everything about it from the juice, to the creamy chipotle sauce, to the scrumptious slice of Pepper Jack cheese.
Yummmm!

You can find the original recipe here and below is how I made it :)

Ingredients
1 3-4 lb beef roast
1 cup water
1 cup salsa
1/2 envelope Lipton's onion soup mix
1/2 envelope Hidden Valley Homemade Italian dressing mix
1 envelope Au Jus gravy mix

Creamy Chipotle Sauce
1/3 cup sour cream
2 TBS Chili Sauce 

Directions
Cut each Hawaiian roll in half and place on a baking sheet. Place a slice of Pepper Jack cheese on the bottom half of each roll. Place the baking sheet in the oven with broiler on low. Broil for about 1 minute until the edges of the rolls are golden and toasty and the cheese is nice and melted. Please keep a close eye on the rolls to make sure they do not burn!! Remove the toasted rolls from the oven :)

Pile some shredded beef on top of the Pepper Jack cheese. Spread the chipotle sauce on the top half of the roll. Now place the top half of the roll on to the bottom half. 
 Don't forget to enter my terrific giveaway here! The drawing ends Sept. 14th!


Today's Creative Blog


Pop Tart iPhone Case Giveaway!

I am so thrilled to be able to share this fabulous giveaway with you today! 

Moti, over at iCaseSeraSera has graciously provided THE most adorable iPhone case to giveaway to one lucky reader from My Sweet Little Steiner Family.


Told ya it was adorable!

I am lovin' this Pop Tart design! My toddler, Noah, is a Pop Tart fanatic and this sweet little case reminds me of him :) It honestly looks real enough to eat!

You should also check out this other 'looks good enough to eat' Ice Cream Sandwich case!

This store offers a wide variety of iPhone cases including retro and vintage designs, original photography AND custom designs! Moti will work with you personally to help you design the iPhone case perfect for you. 

Here is a little bit about how Moti creates these little pieces of art:
"Each iPhone case is embellished with my original designs one at a time using a unique printing technique that allows me to permanently instill an image into a thin aluminum insert on the back of the molded plastic case. The insert is heated to over 400 degrees, cooled, and then permanently adhered to the phone case. The result is a vibrant, permanent imprint.

This custom made snap-on case is designed to fit all of the iPhone 4 and 4S models. With ample openings for all the buttons and the camera lens, this lightweight case is the perfect phone accessory - instantly customizing any iPhone with color and style."


How to Enter:
There are 3 ways to enter... the more ways you enter, the more chances you have!
{you must be a follower of my blog}

1. Leave a comment below!
2. Like my Facebook page
3. Follow me on Twitter and tweet me to let me know you've entered!

Don't forget to check out Moti's awesome shop iCaseSeraSera!
Even if you don't win, you can still own one of these awesome iPhone cases!

The giveaway will end September 14th... that's an entire week to get your chances in!


Thank you, Moti :)

9.05.2012

Chicken Fettuccine Alfredo {Cajun Style}


To be honest, I have never been much of a pasta lover other than spaghetti.... Until THIS dish! Oh my wow! All of the flavors work so well together, combining to make the best meal I have ever made. No lie. The BEST!

My husband is a huge fan of Chicken Alfredo... also super picky... and he agreed this is the best pasta he's ever tasted.

So be warned... you will stuff yourself silly.

We did.

Ingredients
3 small boneless skinless chicken breasts 
Cajun blackening spice (I used Zatarain's)
2 TBS butter (divided)
1 TBS olive oil
1 TBS minced garlic
2 Roma tomatoes (diced)
¼ cup chicken broth
1 ½ cups heavy cream
1 ½ cups Shredded Italian Five Cheese blend
3 oz. crumbled goat cheese
1 tsp. salt
1/2 tsp. ground black pepper
16 ounces Fettuccine noodles (cooked)

Directions
Please remember: Noodles should already be cooked, rinsed in hot water, drained and set aside. Just follow the box directions.

First, pound chicken breasts flat with a meat mallet. Set the breasts on a plate and sprinkle with blackening spice on both sides (don't be too shy with the seasoning, it gives the chicken a great flavor!) Rub the seasoning into the chicken with your fingers to ensure good, even coverage.
Preheat the oven to 350 degrees F.
In a large skillet, heat 1 TBS. of the butter, and add the olive oil, over medium high heat. Once the butter begins to brown, place the chicken in the skillet. Sear on one side, until it is very brown, this should only take a few minutes. Then flip the chicken and do the same on the other side. Place the browned chicken onto a baking sheet and bake for 10 minutes. (set pan aside, just as it is, it will be used again for the sauce!) Make sure the chicken is completely done (no longer pink inside!) Once the chicken is fully cooked, cut into strips or bite sized pieces (your preference.) Set the sliced chicken aside. 

Now on to the sauce! Re-heat the skillet you used to sear the chicken over medium heat. Pour chicken broth into the skillet and whisk all of the brown bits off the bottom of the pan. Next, add in the minced garlic and the tomatoes. Sauté until the tomatoes begin to soften. This should only take about 3-4 minutes. Now turn the heat down to medium low and add in the heavy cream. Stir constantly for 1 minute. Next, add in the salt, pepper, and the other tablespoon of butter. Keep stirring the cream mixture, letting it simmer for about 5 minutes. Remove the pan from the heat, and add in the shredded cheese and goat cheese. Stir the cheeses in until completely melted and the sauce becomes smooth. Now have a little taste of that amazing sauce. You've earned it ;) Once you've finished tasting the sauce and trying not to gobble it all up, pour the fettuccini noodles in with the sauce. Work to coat the noodles well (tongs work well.) Add in the chicken, continue to combine the sauce, noodles and chicken together until everything is well coated with all of that creamy, cheesy goodness. (


** If you are making this for small children, you may want to go ahead and take out some of the pasta and sauce mixture for them, before you add in the spicy chicken.


Original recipe credit: Comfortably Domestic

9.03.2012

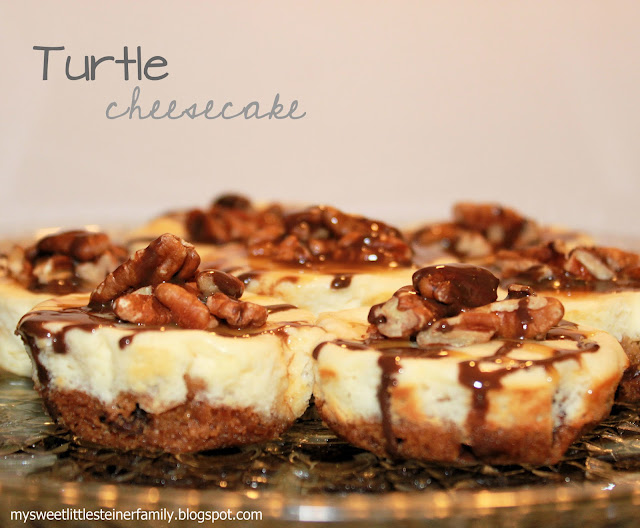
{Mini} Turtle Cheesecake


I am a fan of pretty much any dessert in {mini} form. You get to enjoy all of that sweet, yummy goodness... without feeling too guilty!

Let me just tell you, these babies went like hot cakes! So if you are planning on making these, save a few for yourself, and expect no leftovers!

Ingredients
12 pieces NESTLE® TOLL HOUSE® Refrigerated Ultimates Turtle Cookies
1 (8 oz) package whipped cream cheese
1/2 cup NESTLE® CARNATION® Sweetened Condensed Milk
1 large egg
1 teaspoon vanilla extract
Chopped Pecans
Chocolate Syrup ( I used Magic Shell Chocolate Fudge)
Caramel Syrup


Directions

PREHEAT oven to 325 degrees F. LINE your cupcake pan or muffin tin with liners or parchment paper. CUT 6 of the pre-cut dough squares in half. PLACE the 1/2 square into the lined cup. BAKE for 10 minutes or until cookie has spread to the edge of the cup. BEAT the cream cheese, sweetened condensed milk, egg and vanilla extract in medium bowl until completely smooth. POUR about 1 1/2 to 2 TBS of the cream cheese mixture over each cookie. BAKE for additional 17 minutes or until the cheesecake has set (slightly jiggles but still firm.) COOL completely in the pan on a wire rack. TOP with chopped pecans. DRIZZLE with chocolate and caramel syrup. EAT :)


Trust me. They taste as good as they look... maybe even better ;)


AND don't forget to check out my awesome giveaway here! The drawing ends September 14th!